


Tessa’s Recipe Rundown
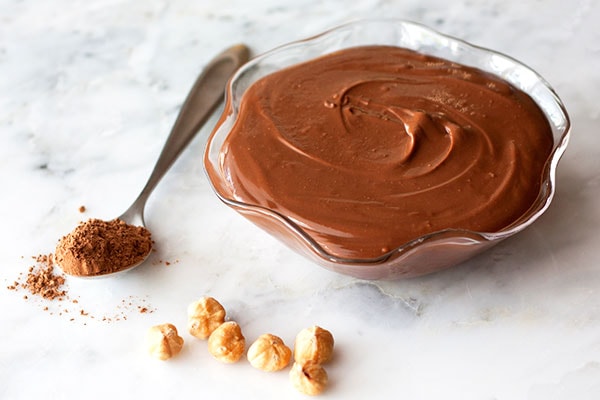
Taste: More nutty than store-bought Nutella and also not quite as sweet, but in a great way. Texture: Smooth and thick yet spreadable. The Nutella was runny straight out of the blender because the friction of the spinning blades had heated it up quite a bit. Once it cooled to room temperature it thickened. Ease: Very easy, the blender does a lot of the work. If you want to take a short-cut, however, you could buy toasted hazelnuts. Appearance: Don’t you want a spoonful? Pros: Simple and delicious homemade version of my favorite chocolate spread. Cons: None! Would I make this again? Yes. I plan to use this homemade Nutella in other recipes!This post may contain affiliate links. Read our disclosure policy.
I will never understand people who don’t like Nutella…
What’s not to love?! It’s nutty and chocolaty, and instantly elevates any dessert to a whole new delightful level. I actually found two massive containers of Nutella hiding out in my pantry a couple weeks ago and felt like I won the jackpot.
I’ve been on an organizing rampage lately, as you can see from this behind-the-scenes kitchen video I posted to my YouTube channel a few weeks ago. Finding those Nutella jars made me wonder what else was hiding in the dark corners of my kitchen.
You can’t miss my huge Vitamix and food processor in my cabinets, both take up quite a bit of space but they’re so worth it! Especially because they can both make this homemade Nutella which is absolutely scrumptious and so much cheaper than whatever I paid for those massive jars.
Actually, the reason this post came about is because I saw Nutella was on sale at the store the other day for $5 for a tiny jar. That doesn’t really seem like a sale price to me. If you buy hazelnuts in bulk (you can store them in the freezer to extend their shelf life) and toast them yourself, this recipe becomes a pretty cheap and cleaner version of the beloved spread!
How to Make Nutella from Scratch
What kind of nuts to use for Nutella recipe
Nutella is made with hazelnuts, which are also called filberts at some grocery stores. To bring out all the nutty and characteristic hazelnut flavor, the recipe calls for toasting the nuts. I like to do it in my oven, more specifically my Breville Smart Toaster Oven, because I can prepare the other ingredients while they’re toasting.
However, you can also toast the nuts in a small skillet on the stove top over medium heat. Toast for about 5 to 10 minutes, or until they’re fragrant and begin to brown and the skin begins to blister. Be careful not to burn!
The next step is removing the skins. In my experience most hazelnuts, especially the more economical bulk-bin ones, come with the skin on. So to remove that skin you simply pour the hot hazelnuts into a clean kitchen towel. Wrap up the towel and vigorously rub the nuts all together to loosen and remove the skin. The skin should stick to the towel and you can pick up the hazelnuts with your fingers to toss them into the blender bowl. Don’t worry if not every single bit of skin is removed, it’s not a big deal.
How to make Nutella without hazelnuts
If you don’t like, are allergic to, or can’t find hazelnuts you can use another type of nut! I really enjoy almonds in this recipe.
What kind of chocolate to use to make homemade Nutella:
So this recipe calls for chocolate in two forms: melted milk chocolate and a little cocoa powder. The milk chocolate gives a level of sweetness most similar to packaged Nutella, but feel free to use semisweet or even bittersweet for a more intensely chocolate and less sweet flavor. The cocoa powder lends that ultra rich chocolaty taste and helps to slightly thicken the mixture.
The Oil
I typically use a very mild oil like canola oil when making this recipe, both because I always have it on hand and because it’s inexpensive. The oil is necessary to give the Nutella its rich and creamy texture. However, an even better option is to use hazelnut oil! Or even almond oil. I just know that most of us won’t have that readily available in our pantry.
The Sugar
The recipe calls for 3 tablespoons of powdered sugar. This not only lends sweetness, but also thickness. If you don’t have any powdered sugar on hand check out my DIY Powdered Sugar tutorial here.
You can also use a refined-sugar alternative here like maple syrup, but just note the flavor profile will change slightly.
How to blend homemade Nutella
The blender or food processor does most of the hard work in this recipe, yay! But you do need an appliance that has some power to it. A super old or cheapie one just won’t be able to grind the hazelnuts fine enough. I used my beloved Vitamix when making this recipe, but even then homemade Nutella will always be just slightly less smooth than the commercially manufactured kind. If that bothers you feel free to press the Nutella through a fine mesh strainer before storing or serving to remove any larger pieces of hazelnut.
How to Store Nutella
Mason jars make the perfect cute and practical storage solution. The homemade Nutella will last up to 2 weeks at room temperature. You just want to make sure the Nutella has cooled completely from the friction heat of the blender before storing.
Nutella Recipes

Homemade Nutella
Ingredients
- 1 cup hazelnuts
- 12 ounces milk chocolate, chopped
- 2 tablespoons canola oil
- 3 tablespoons powdered sugar
- 1 tablespoon unsweetened cocoa powder
- 1/2 teaspoon vanilla extract
- 3/4 teaspoon salt
Instructions
- Preheat the oven to 350°F.
- Spread the hazelnuts in a single layer on a rimmed baking sheet. Toast the hazelnuts until they’re slightly browned and the skin is slightly blistered, about 10 minutes. Wrap the hazelnuts in a kitchen towel and rub vigorously to remove as much loose skin as possible (some skin may not remove, that’s fine). Let cool completely.
- Place the chocolate in a microwave-safe bowl and microwave in 30-second bursts, stirring between each burst, until the chocolate is melted and smooth. Let cool completely.
- In a high-powered blender or in a food processor, grind the hazelnuts until they form a paste. Add the oil, sugar, cocoa powder, vanilla, and salt and continue to process until the mixture is as smooth as possible. Add the melted chocolate and blend until smooth. Press the mixture through a fine strainer to remove any chunks of hazelnuts that might be left behind. Allow the mixture to cool (will be warm from blending or processing). Store the mixture in an airtight container at room temperature for up to 2 weeks.


I just made this exactly as directed. After I pushed it through a sieve, it was still a bit gritty. I used a high powered mini food processor.
1. I don’t think the texture will get as smooth as store bough Nutella, is that correct?
2. I left it on the counter to cool before placing a lid on it, but it hardened, a lot! Is is supposed to get rock hard?
3. How do I soften it? I’d like to salvage it, since the ingredients were very pricey!
i think it is a well desevre dish
Actually, the thing where some people report that it sets hard on their kitchen counters? You’re in Arizona, right? I guess your kitchen is a bit warmer than most?
Also, made this now – it’s nice, bit too salty for me ‘as is’, unfortunately my 4yo (who’s never had Nutella) isn’t a fan – hey ho.
Thanks!