


Tessa’s Recipe Rundown
TASTE: The perfect summer pie! Bright fruit flavors wrapped in a buttery pie crust.
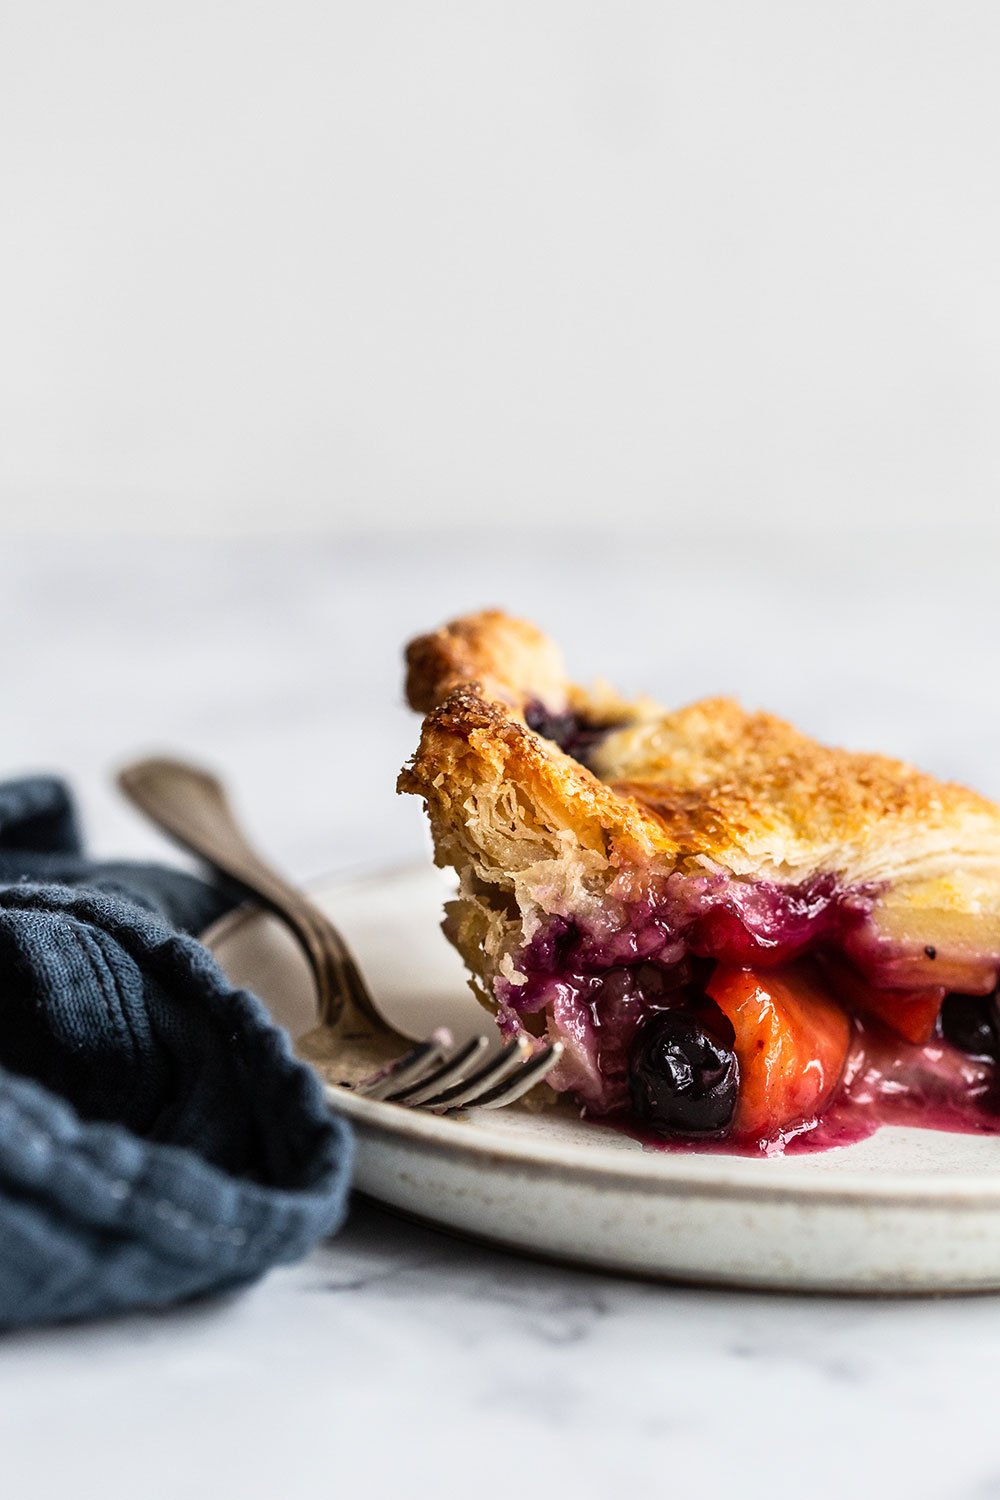
TEXTURE: Thick, luscious fruit filling with no wateriness in sight, and a beautifully flaky crust.
EASE: This isn’t exactly a quick recipe, but it’s totally worth the time and effort for this homemade fruit pie.
PROS: The perfect summer recipe!
CONS: Time-consuming.
WOULD I MAKE THIS AGAIN? 100%
This post may contain affiliate links. Read our disclosure policy.
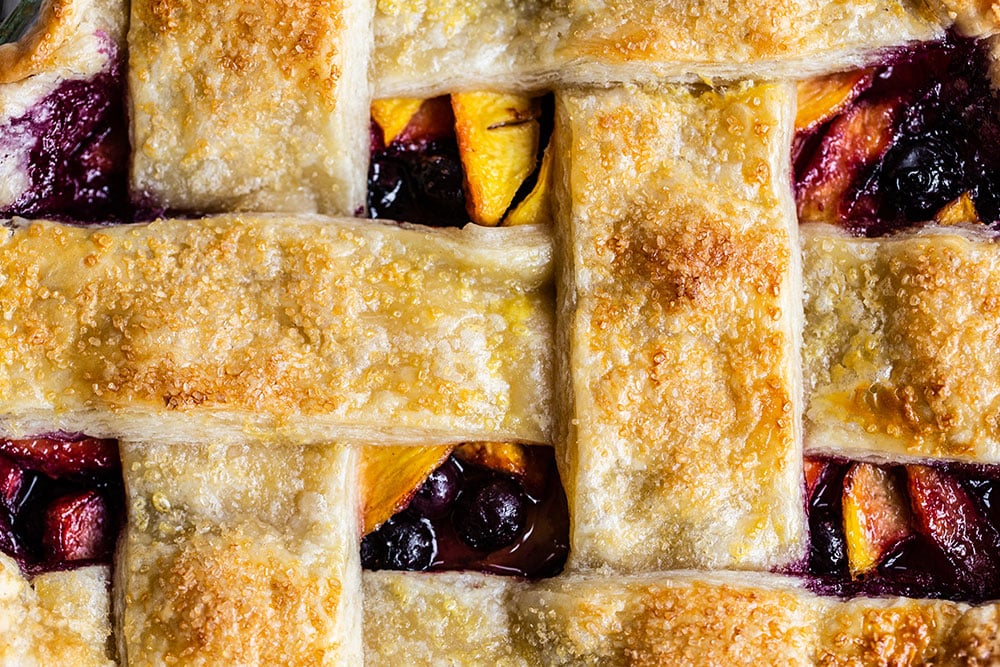
This Blueberry Peach Pie captures the epitome of summertime flavors, wrapped in a deliciously flaky pie crust.
Pie wasn’t always a strong forte for me. I used to find the process a bit challenging and time-consuming. Especially in the Phoenix summer, when butter begins to melt practically the moment it leaves the fridge.
I decided to change my tune recently. To enhance my pie skills. It was a frustrating but illuminating process.
I baked this particular blueberry peach pie recipe with minor adjustments 3 times before it was just right. Which is quite time-consuming, considering homemade pie is more of an all-day weekend project.
But I’m SO thrilled with the results. The crust remains perfectly crisp and flaky, which is a challenge considering how much water content is in the fruit. Use my all butter best ever pie crust recipe for best results!
The filling is rich, thick, and luscious without turning watery. The flavor is intense with summer sweetness, but not cloying like store-bought pies. I’m obsessed!
I’ve included a TON of fruit pie tips below to ensure yours turns out perfectly. Make sure to give them a read before diving into the recipe.
Homemade Blueberry Peach Pie Recipe Tips
How to Prevent Watery Fruit Pie Filling
Watery pie fillings are the WORST! They used to happen to me all the time. Here’s what I’ve learned to prevent it:
1) The more ripe your fruit, the more moisture your filling will have. If your fruit is super moist and juicy, you may want to add an extra tablespoon of cornstarch.
2) Macerating the fruit is an extra step but it makes a HUGE difference in preventing watery filling. Macerating basically just means tossing the fruit with the sugar called for in the recipe, then letting it sit for 30 minutes to 1 hour. The sugar will draw moisture out of the fruit so it collects at the bottom of the bowl.
3) Boil the macerated juices into a syrup. This step is so worth it. Not only does it help ensure a thick and luscious filling, but it also intensifies the fruit flavors. Strain the fruit and collect those macerated juices into a saucepan. Boil for a few minutes, or until it thickens into a syrup. Let cool before adding back into the filling mixture.
4) Start with a high baking temperature to activate the cornstarch’s thickening properties. Cornstarch won’t begin to thicken until it’s heated to about 200°F. So you’ll see the recipe below starts at 400°F and then, once the filling and crust set into place, we reduce the temperature to 375°F to prevent the crust from burning. The first iterations of this recipe I reduced the temperature from 400°F to 350°F and would end up with a more watery filling and soggy crust. That’s why it’s really important to…
5) Bake your pie completely! It should be deeply golden brown and have an internal temperature of at least 215°F. Underbaked pies will be soggy and watery.
How to Prevent Soggy Pie Bottoms
If you often have problems with your bottom pie crust becoming soggy and losing its crispiness or not holding its shape, there are a few easy fixes.
- Take the steps above to prevent a watery filling.
- Try adjusting your oven rack to the bottom position. This will allow the heating element to better cook the bottom crust and develop more browning before too much moisture from the filling penetrates it.
- Place a baking stone on that bottom oven rack while the oven preheats, then place your pan on top of the stone. Again, this will help conduct heat better so that the bottom crust gets nicely golden and crispy.
- Be sure not to allow your assembled pie to sit too long before baking. I would only recommend freezing before baking. Don’t let it sit at room temperature or in the fridge. This will allow moisture from the filling to leach out and create those soggy bottoms.
How to Assemble Blueberry Peach Pie
1. Make your pie dough the day before baking the pie. Here’s the recipe for my Best Ever Pie Crust, which has ingredient measurements for a double-crust pie. Letting the pie dough rest overnight allows the gluten to relax and the starches in the flour to absorb some moisture. This makes the dough MUCH easier to work with. Less springing back and fewer cracks.
2. Peel and pit your peaches. If they’re really super ripe, you’ll need to use the boil peeling method (YouTube will show you how). Otherwise, I usually just use a sharp peeler. Slice and toss your peaches, blueberries, and sugar together and let macerate for 30 minutes to 1 hour.
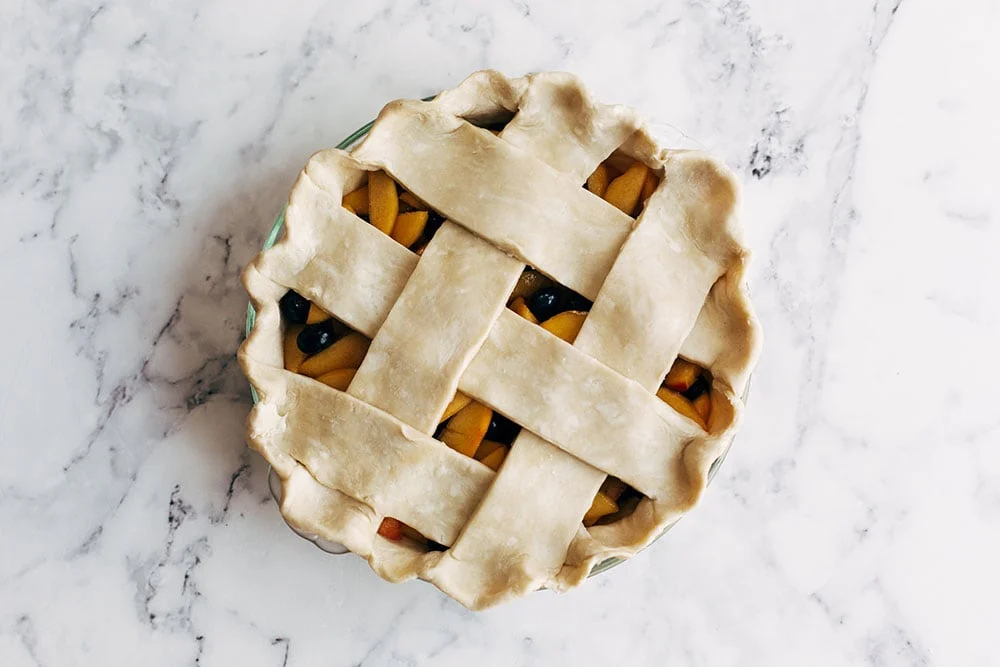
3. Meanwhile, roll out one disk of pie dough into an even circle, about 12-inches in diameter and 1/8-inch in thickness. Roll the dough up and onto your rolling pin then unroll onto your pie plate. DO NOT STRETCH THE DOUGH TO FIT! Gently allow it to sink into the shape of the pan. If you stretch, it’ll snap back like a rubber band and shrink while baking. Use scissors to trim the edges to a 1-inch overhang. Cover and refrigerate this unbaked pie shell.
4. Repeat with the second piece of dough, this time cutting into 2-inch strips. You’ll actually need more dough for the lattice, so if one disk is bigger than the other, use that one for the lattice. Place the strips of pie dough on a baking sheet and refrigerate.
5. Boil off the juices from the macerated fruit until syrupy. Let cool. Toss with the fruit and remaining filling ingredients.
6. Assemble. Fill the pie shell with the filling. Arrange lattice topping, making sure to trim the edges of the strips so your border isn’t too thick and heavy that it slumps down. Crimp the crusts together using your fingers or a fork.
7. Freeze for 30 minutes while you preheat the oven. The idea with fruit pie is to start cold and then immediately move to hot. Freezing will help the pie keep its shape as it bakes.
How (and Why!) to Make a Lattice Top
- Besides being pretty and impressive, lattice pies are handy for moisture-rich fillings like this blueberry peach pie filling. There’s a lot of water content that turns into steam and will need to evaporate as it bakes. Lattice, by design, allows that steam to readily escape.
- I prefer a more modern lattice with thicker strips of pie dough, but feel free to get creative and do whatever you like.
- I have an entire article that includes a video + step-by-step photos of How to Make a Lattice Pie Crust.
- Don’t worry if you get tripped up. You can always return your strips of pie dough to the fridge if they get too warm while you figure it out.
How to Make Peach Blueberry Pie Recipe Ahead of Time
How to Store Pie Filling
- Fruit fillings are perfect for freezing. Make the Blueberry Peach Pie filling according to the directions.
- Cover your pie pan with foil. Scoop pie filling into a pie tin, cover, and freeze until very firm.
- Remove the filling and peel off the foil.
- Place the frozen block of filling in an airtight container and freeze for up to 3 weeks.
- To serve, place the filling into the same pie tin with the prepared crust and follow the recipe to bake. No need to thaw the filling!
How to Store Pie Dough
- Pie dough can be shaped into a disk and refrigerated for up to 3 days, as long as it’s well wrapped in plastic.
- It can also be frozen for up to 2 months, well-wrapped in plastic wrap.
- Defrost in the fridge overnight before rolling out to bake.
How to Prepare Assembled Pie in Advance
- Fridge: Completely assembled, unbaked pies should only be refrigerated for a few hours before baking, otherwise you may end up with a soggy crust.
- Freezer: Fruit pies freeze better unbaked. Assemble the Blueberry Peach Pie fully, double wrap in plastic, and then freeze for up to 1 month. Let the pie partially thaw at room temperature for about 1 hour, then bake as directed by the recipe, adding about 10 minutes to the baking time.
How to Store Baked Blueberry Peach Pie
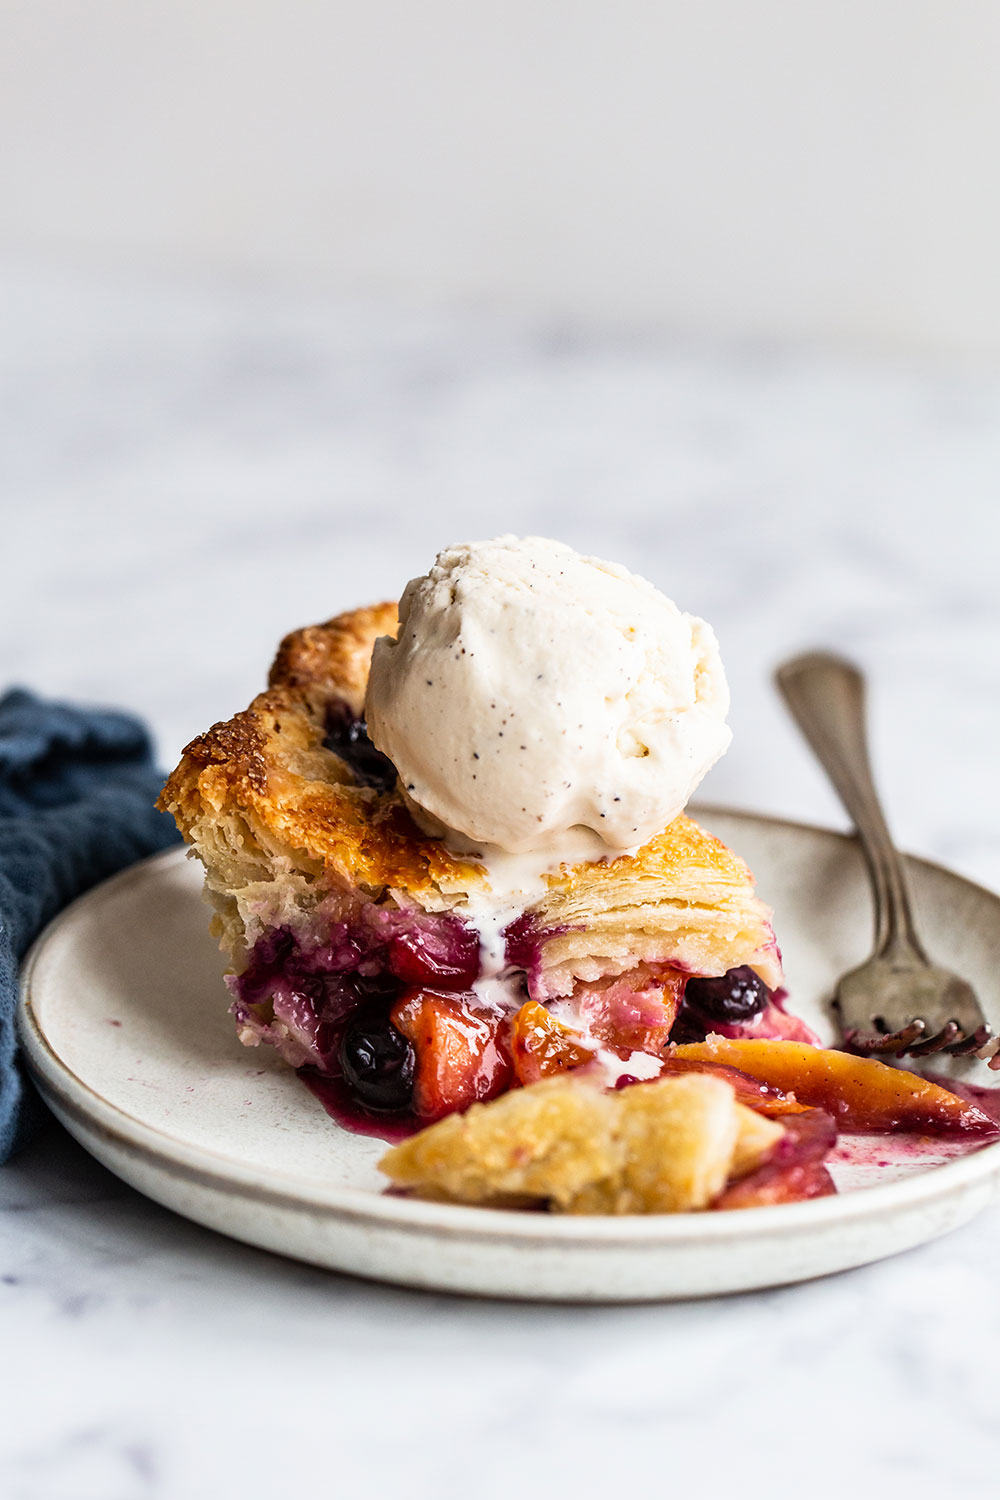
Store leftover Blueberry Peach Pie wrapped in foil for up to 1 day at room temperature, or store covered in the fridge for up to 5 days. Reheat in a 325°F oven for 5 to 10 minutes if desired. This helps refresh the pie crust so it’s crispy again. Serve with vanilla ice cream for the ultimate summer treat!
More Homemade Pie Recipes:
- My BEST EVER Pie Crust Recipe (extra flaky!)
- Blueberry Pie
- Caramel Apple Streusel Pie
- Pecan Pie
- French Silk Pie
More Peach Dessert Recipes:
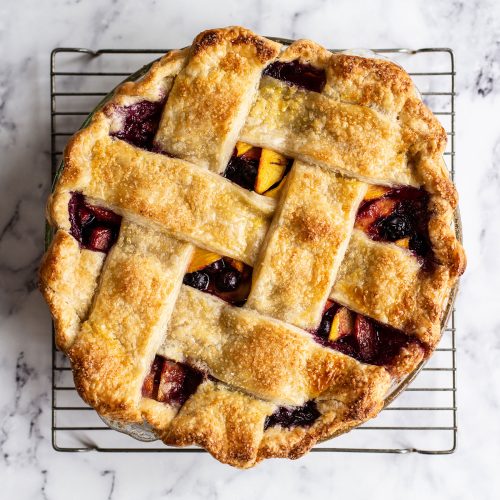
Peach Blueberry Pie
Ingredients
Filling:
- 4 cups (680 grams) fresh peeled and sliced peaches (about 6 peaches)
- 1 1/2 cups (200 grams) fresh blueberries
- 3/4 cup (150 grams) granulated sugar*
- 1/4 cup (40 grams) cornstarch
- 1 tablespoon fresh lemon juice
- 1/2 teaspoon ground cinnamon
- 1/4 teaspoon fine salt
- 1 tablespoon unsalted butter, diced
Double-crust pie dough
Egg wash:
- 1 large egg yolk
- 1 tablespoon heavy cream or whole milk
- Turbinado or coarse sugar, for sprinkling
Instructions
Make the filling:
- In a large mixing bowl, combine the peaches, blueberries, and granulated sugar. Allow to sit at room temperature for at least 30 minutes to 1 hour to macerate, until juices have collected at the bottom of the bowl.
- Strain out the juices into a small saucepan. Return fruit back to mixing bowl. Place the saucepan on the stove over medium-high heat and cook until the juices are reduced and syrupy, about 5 minutes. Set aside to cool.
- Pour the cooled, syrupy mixture back over the fruit. Add in the cornstarch, lemon juice, cinnamon, and salt and toss to combine. Set aside.
Prepare the dough:
- Remove the smaller of the two disks of pie dough and let sit at room temperature for up to 5 minutes, or until slightly pliable.
- Roll the dough out on a floured work surface. Keep turning the dough after every roll to ensure it doesn’t stick to the counter and is of even thickness. Use your hands to cup the edges of the dough to keep it smooth and prevent cracks. Add additional flour to the dough, the counter, and your rolling pin as needed. Roll out into about a 12-inch circle with a 1/8-inch thickness.
- Gently roll the dough up and around the rolling pin then unroll and drape over a 9-inch pie tin. Gently press into the pie tin. Do not stretch the dough. Trim edges to 1-inch with scissors. Cover and place in the fridge.
- Remove the other piece of dough from the fridge and repeat the above, rolling out to a 13-inch circle. Using a pastry wheel, cut 2-inch wide strips. You should have 5-6 strips. Reroll and cut the scraps to have as many strips as needed. If the dough becomes too warm to handle, transfer to a cutting board or baking sheet and refrigerate until firm again.
Assemble the pie:
- Pour the fruit mixture into the refrigerated pie shell, flattening and adjusting to make it fit evenly. Dot with the pieces of butter. Brush the edges of the chilled pie shell lightly with water.
- Place 3 to 4 strips of pie dough over the filling, spacing evenly. Fold back every other strip. Place a long strip of dough down the center. Unfold the other strips the fold back up the opposite strips. Place another piece down. Repeat this weaving process until you have a lattice pattern. Trim the lattice pieces so they’re more flush with the border of the pie.
- Tuck the edges up and over to create a border, sealing everything together by pressing with your fingers. Use your fingers to make a deep crimping pattern. Transfer to the freezer for 15 to 30 minutes.
- Meanwhile, adjust the oven rack to the lower third position. If you have one, place a baking stone or steel on the oven rack to help the bottom crust remain crispy. Preheat the oven to 400°F
- In a small bowl, whisk together the egg yolk and cream. Remove pie from freezer. Brush all over with egg wash. Sprinkle generously with turbinado sugar. Bake on a parchment-lined rimmed baking pan until the edges are lightly brown, about 25 minutes.
- Reduce heat to 375°F and continue baking for another 45 to 55 minutes, or until the edges are deeply brown and the filling is bubbling. If the edges become too dark, use a pie shield or foil to protect them from the heat. Glass and ceramic pie pans will take longer to bake than metal.
- Cool completely before serving. Store leftovers wrapped in foil for up to 1 day at room temperature, or store covered in the fridge for up to 5 days. Reheat in a 325°F oven for 5 to 10 minutes.
Recipe Notes
Photos by Ashley McLaughlin.


Amazing pie! If you follow the directions, no soggy bottoms! Made this for a party and it was a huge hit!
Hi Jen! So excited this pie was such a hit!! Yay for no soggy bottoms!!!
In the step where you say to put the assembled pie in the freezer for 30 minutes before baking I’m wondering if I can do that with a glass pie plate without it breaking? Or should I put the assembled pie in the refrigerator instead?
Hi Cait! It depends on the type of glass plate! Something like this OXO glass pie pan is great, because it’s made from borosilicate glass, so it’s designed to withstand extreme temperature changes without shattering. If you’re not sure what material your glass pie plate is made from, I would recommend instead using a light-colored metal pan, like this one, so you can safely transfer from freezer to oven 🙂 I hope that helps! Feel free to reach out with any further questions! Happy baking 🙂
What would you have to do if you were to use frozen fruit?
Hi Madison! We haven’t tested for that, so I can’t say for sure! My advice would be to thaw the fruit first, and then follow the recipe from there. You will probably end up with a lot more juices than you would if using fresh fruit, but Tessa’s trick of simmering and reducing the sugary syrup should help! I hope that helps! Happy baking 🙂
I forgot to add parchment paper into my glass pie pan.. (it wasn’t mentioned until later in the recipe). Do I need to find a way to remove it from the glass pan that I originally formed it in or will it be okay? This is my first pie I’ve ever made!
Hi Taylor! The parchment is actually going to be underneath your pie pan while it’s in the oven, not in it. You’ll place your entire pie pan onto a parchment lined rimmed baking sheet to bake. This will ensure that none of the juices from your pie will leak onto your oven floor. Hope that helps! Check back in with us to let us know how it goes!
When I put the fruit juice in the saucepan and heated, it didn’t turn into syrup until it was burnt, rendering it unusable. What did I do wrong?
How long did you have it on the stove for and how hot was your burner? Boiling the juice for just a few minutes should be enough, I’d say about 3-5 minutes. I’m thinking you either had the heat up to high or just cooked it for too long. It’s definitely something you don’t want to walk away from while it’s cooking!
Everyone loved this pie! Crust and filling were perfect! Before my husband tried it, he asked why I didn’t just buy the pie. After he said I should buy the rest of the meal, but bake the pie.
hahaha what an amazing compliment from your husband!! I’m absolutely thrilled your pie was a huge hit!
Can I prepare the fruit filling one day ahead without freezing it?
That should be fine 🙂
I made this pie a few weeks ago. It is delicious! The crust is so buttery, I can’t wait to try it with a fall filling.
I’ve made the pie dough and peach blueberry pie twice this month for family birthday parties. The pie is exquisite and the crust is magnificent, so crisp and tasty. I probably make one pie a year so I am thrilled to have the enthusiastic response to my efforts. Thanks so much for a yummy pie!
Breath-taking one!! Keep up the Good work